Next: Statistical Equilibrium
Up: The Lambda Iteration
Previous: The Emissivity Function
Solving the Radiative Transfer Equation
The first iteration now starts by calculating, for each ring and each transition, the
new radiation field, given the present level populations. It does this by calculating, for
each transition in each ring, the radiation intensity contributed by each line
of sight. In each case this simply involves adding up the contributions from each
ring segment that the line of sight intersects. Integrating the intensity around  steradians
gives the total radiation intensity at any
one point in that ring. However, as the rings may be moving relative to one another it is also
necessary to take into account the Doppler shifting of the emitted frequencies. This
is done by considering 11 different velocities (ie. frequencies) centred around the
line centre4.9. Therefore rings whose emission is shifted so far in velocity that it
falls outside these 11 velocities will not contribute to the line. This process will now be described in
detail.
steradians
gives the total radiation intensity at any
one point in that ring. However, as the rings may be moving relative to one another it is also
necessary to take into account the Doppler shifting of the emitted frequencies. This
is done by considering 11 different velocities (ie. frequencies) centred around the
line centre4.9. Therefore rings whose emission is shifted so far in velocity that it
falls outside these 11 velocities will not contribute to the line. This process will now be described in
detail.
The calculations are performed on each segment ( )
on each line of sight (
)
on each line of sight ( )
for each velocity
step (
)
for each velocity
step ( )
for each transition (
)
for each transition ( )
in each ring (
)
in each ring ( ). The first step is to adjust the optical depth to
take into account the velocity shift due to the Doppler effect. The optical depth per unit length for each ring was
calculated in the first pass through the convergence check section (equation 4.27) and is
adjusted to give4.10
). The first step is to adjust the optical depth to
take into account the velocity shift due to the Doppler effect. The optical depth per unit length for each ring was
calculated in the first pass through the convergence check section (equation 4.27) and is
adjusted to give4.10
 |
(4.28) |
where  is the velocity of the segment relative to the start of the line of sight (it is given by
the average of the two relative velocities at the start and end of the segment as given in the
is the velocity of the segment relative to the start of the line of sight (it is given by
the average of the two relative velocities at the start and end of the segment as given in the
 array).
 is the velocity width of the ring in which the line of sight starts and
 is the velocity width of the ring in which segment lies. So
 represents the
optical depth per unit length of segment
as seen by an observer in ring
at a particular
velocity shift, indexed by .
By multiplying this by the length of the segment the total optical
depth for the segment at the required velocity shift is
produced. This is stored in array
represents the
optical depth per unit length of segment
as seen by an observer in ring
at a particular
velocity shift, indexed by .
By multiplying this by the length of the segment the total optical
depth for the segment at the required velocity shift is
produced. This is stored in array  by the program and represents
 .
.
Now applying the radiative transfer equation yields the radiation intensity due to this segment
on the starting position of the line of sight
 |
(4.29) |
where  is the length of the segment. So
 represents the radiation intensity on ring
due to
the molecules in the ring containing segment
that are radiating at velocity offset
after taking
into account the absorption of this radiation by the material in segment
and all other intervening
segments.
represents the radiation intensity on ring
due to
the molecules in the ring containing segment
that are radiating at velocity offset
after taking
into account the absorption of this radiation by the material in segment
and all other intervening
segments.
There is unfortunately a problem with this when the optical depth for a particular segment gets too
large. Consider equation 4.29 for  (ie. the first segment on the line of sight),
then if
(ie. the first segment on the line of sight),
then if  is large the term
 will become very small and hence the intensity for that segment (and thereby
the sum for all following segments) will be lower than it should be. In an extreme case the
intensity calculated would be virtually zero whereas of course the actual intensity falling on
the start position of the line of sight would not be zero. The solution for this is to split
the segment up into sufficient shorter subsections such that the optical depth for each segment is
small enough to reduce this effect to an insignificant level - this will mean an optical depth of around 0.2 for each
segment4.11. The program therefore checks at this stage to see what the optical depth for
the segment is. If it is greater than 0.2 the segment is split into
will become very small and hence the intensity for that segment (and thereby
the sum for all following segments) will be lower than it should be. In an extreme case the
intensity calculated would be virtually zero whereas of course the actual intensity falling on
the start position of the line of sight would not be zero. The solution for this is to split
the segment up into sufficient shorter subsections such that the optical depth for each segment is
small enough to reduce this effect to an insignificant level - this will mean an optical depth of around 0.2 for each
segment4.11. The program therefore checks at this stage to see what the optical depth for
the segment is. If it is greater than 0.2 the segment is split into
 segments. It is also necessary to split a segment up if the velocity change across the
segment becomes too large. Unacceptably large errors will occur if
segments. It is also necessary to split a segment up if the velocity change across the
segment becomes too large. Unacceptably large errors will occur if
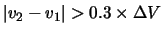 where
where  and
and  are the velocities at the beginning and end of the segment and
  is the ring
velocity width as defined in equation 4.20. If this condition occurs the segment is
split into4.12
is the ring
velocity width as defined in equation 4.20. If this condition occurs the segment is
split into4.12
![$\left[ \frac{\left\vert v_2-v_1 \right\vert}{0.3 \times \Delta V}
\right] + 1$](img683.gif) subsegments.
subsegments.
In addition the value for the total optical depth between the segment and the start of the line of sight is
measured from the centre of the segment. This means that the summation that appears in
equation 4.29 is actually represented in the program as
This primarily avoids problems with optically thin lines of sight, for example a line of sight that has only
one segment on it with an optical depth of 0.2 would use this value in equation 4.29 without the
modification whereas in reality the molecules near the start of the segment will be radiating through an
optical depth of virtually zero and only the few molecules furthest away are radiating through an optical
depth of 0.2. It therefore seems sensible to take some middle value and the program in fact would use 0.1 in
this case. It is not clear whether this actually has any major effect on the lambda iteration for a full sized
model cloud as it may well be that this problem only arises on a few lines of sight and the effect is 'drowned
out' by all the other lines of sight. It is more likely to have an effect on the calculations for the line
profiles especially when just one line of sight is used (ie. no beam simulation).
The question then arises as to what values the parameters in
equations 4.28 & 4.29 should take on these new intersection boundaries.
The original STEN program did a straight linear interpolation between the two surrounding shell
intersections but didn't take into account whether the parameters applied to the shell or the shell
boundary. An additional problem with this method was pointed out in Buckley [7],
namely that when the line of sight takes a long path through a shell, not quite touching the next
shell in, then this method does not take into account the variations of the parameters as the line
moves closer to the centre of the cloud. The method used by Buckley was to interpolate using
the distance to the centre of the cloud. This method is unfortunately not practical in this 2-D
version as the
array does not store information on the absolute position of the line of
sight in the cloud. It is therefore necessary to use a variation on the original method. This
implementation is, however, slightly modified.
The parameters that need adjusting for each segment are the section
lengths, the systematic velocities (defined on the section intersections), the velocity widths (also defined
on the intersections) and the optical depth function (defined for each segment).
The length of each new subsegment is
easily calculated since the original segment is simply divided into equal subsegments. The systematic velocity
was defined on the intersections so the velocity at each new intersection is given by
![\begin{displaymath}v_i=v_e+i\frac{v_e-v_s}{[s]}
\end{displaymath}](img685.gif)
where
is the  subsection along the line of sight.
![\includegraphics[scale=0.6, angle=0]{interpparam.eps}](img687.gif)
However, the other parameters are
defined for each segment (ie. not on the intersections) and there are many different ways of interpolating. The method
that has been chosen here is shown in figure 4.14. A straight linear interpolation
between parameter values at the center of each ring and the appropriate adjacent ring is made
(except for the first and last rings). Each subsegment then picks the values for its parameters from
the appropriate point on this interpolated line. For the special cases of the first and last
segment the outer half of the ring is assigned a constant parameter value. The program actually
does this process in two stages, as the interpolated line will have two sections of different
gradient for each segment. This is shown in figure 4.14 where the thick line
represents the interpolated value of a particular parameter along the line of sight. The section
that covers the 4th segment is shown split into these 2 subsections, one as a dotted section and
one as a dashed section. The new subsegments are shown drawn on as dotted line subsegments and show
how the parameters would be chosen if the segment were split into 8 subsegments.
![\includegraphics[scale=0.8, angle=0]{rmin.eps}](img688.gif)
Some thought needs to be given to situations where this interpolation does not work well.
Figure 4.15 demonstrates the problem by considering a sample line of sight (the
thick line) passing off centre through the cloud (assume it travels parallel to the planes and
thus only the cylinder intersections are of concern). At each intersection the velocity is
defined. When the line of sight segments are split up into subsegments as described above the
velocities at the subsegment boundaries are defined by simple linear interpolation between
these values. The graph on the right shows the value for the velocity at various positions in
the cloud for a
 velocity distribution (eg. a Keplerian disk) as a solid line. The velocity
changes only slowly in the outer part of the cloud but then rises dramatically towards the
centre. The velocities for the intersections (ie. 1, 2, 3, 5, 6, 7) are indicated through the
dotted lines. The dashed line in the velocity graph joins the velocity values at these 6
points and represents the velocity values that the program uses for its calculations. It is
immediately obvious that this method fails badly in the central part of the cloud (ie. between
intersections 3 and 5). This is due to the intersections at 3 and 5 having identical
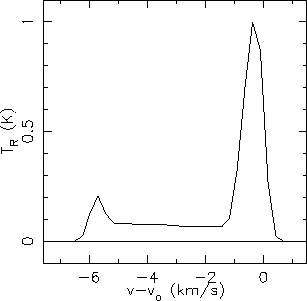
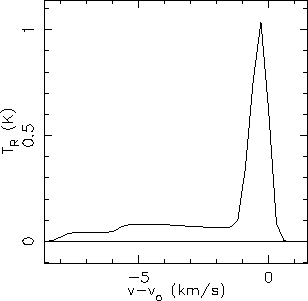
velocities. The effect this has on the final output can be seen in figure 4.16. This
is the result for a beam with 5 gridding points slightly offset from
the centre of a cloud with an
velocity distribution and a constant
velocity distribution (eg. a Keplerian disk) as a solid line. The velocity
changes only slowly in the outer part of the cloud but then rises dramatically towards the
centre. The velocities for the intersections (ie. 1, 2, 3, 5, 6, 7) are indicated through the
dotted lines. The dashed line in the velocity graph joins the velocity values at these 6
points and represents the velocity values that the program uses for its calculations. It is
immediately obvious that this method fails badly in the central part of the cloud (ie. between
intersections 3 and 5). This is due to the intersections at 3 and 5 having identical
velocities. The effect this has on the final output can be seen in figure 4.16. This
is the result for a beam with 5 gridding points slightly offset from
the centre of a cloud with an
velocity distribution and a constant  and abundance distribution. The offset is sufficient so that none of the beam reaches to the centre of the
cloud (hence why only one 'wing' is seen). It can be clearly seen that there is an artificial looking blip at
the -7 km s
and abundance distribution. The offset is sufficient so that none of the beam reaches to the centre of the
cloud (hence why only one 'wing' is seen). It can be clearly seen that there is an artificial looking blip at
the -7 km s position. This is caused by one of the offcentre lines in the grid (see
section 4.8.3) experiencing the
effect described above, all the material in the innermost section emits at the same velocity
rather than being spread out over a range of velocities, thus there is too much emission at
that velocity. The program deals with this by searching for the position along the line of
sight that is closest to the central line of symmetry in the cloud (ie. the
position. This is caused by one of the offcentre lines in the grid (see
section 4.8.3) experiencing the
effect described above, all the material in the innermost section emits at the same velocity
rather than being spread out over a range of velocities, thus there is too much emission at
that velocity. The program deals with this by searching for the position along the line of
sight that is closest to the central line of symmetry in the cloud (ie. the  line). At
that point the innermost segment is split into two and the correct velocity for that central
point is calculated (ie. effectively point 4 in figure 4.15 is inserted). The interpolation then functions as shown by the dashed/dotted line in
figure 4.15 which is a much closer representation of the actual velocity
field. The result of this modification can be seen in figure 4.17. Further improvement will only come by adding more cylinders to the model. This system
is not perfect, it deals quite well with an
velocity distribution however
there are certainly other velocity distributions where it may not work as well. Anywhere
where there are rapid velocity changes should be treated with care (eg. the edges of outflow
regions).
line). At
that point the innermost segment is split into two and the correct velocity for that central
point is calculated (ie. effectively point 4 in figure 4.15 is inserted). The interpolation then functions as shown by the dashed/dotted line in
figure 4.15 which is a much closer representation of the actual velocity
field. The result of this modification can be seen in figure 4.17. Further improvement will only come by adding more cylinders to the model. This system
is not perfect, it deals quite well with an
velocity distribution however
there are certainly other velocity distributions where it may not work as well. Anywhere
where there are rapid velocity changes should be treated with care (eg. the edges of outflow
regions).
Using the above method for calculating the emission from each segment the program then
proceeds to add up all the contributions from all the segments along the line of sight. This then gives the
total radiation intensity from that line of sight, ie.
The second term here adds the radiation contribution from the cosmic background radiation (at
2.73 K), after taking
into account its passage through the cloud. Since the lines of sight are distributed evenly in all
directions it is now possible to calculate the radiation intensity on the ring at this particular
frequency by summing all the lines of sight and integrating over
steradians
now adjust this to take into account its velocity shift
Note that the factor of
does not appear here, this is because it will be cancelled in the next step by a factor of
 .
The theory behind these steps is described on page
.
The theory behind these steps is described on page ![[*]](icons/cross_ref_motif.gif) - these four equations are the implementation of
equation 3.18.
The radiation now needs to be integrated over the velocity range in order to finally yield the total
radiation intensity on a ring due to all other rings (and the cosmic background) for each transition.
- these four equations are the implementation of
equation 3.18.
The radiation now needs to be integrated over the velocity range in order to finally yield the total
radiation intensity on a ring due to all other rings (and the cosmic background) for each transition.
Once the radiation field has been established the new population levels based on this
radiation field can be calculated. This is done in the levels subroutine.
Next: Statistical Equilibrium
Up: The Lambda Iteration
Previous: The Emissivity Function
1999-04-12